How to Tell If a Chicken Egg Is Fertile in 10 Simple Steps
Many people who keep chickens know how exciting it is to hatch their own eggs, but figuring out which eggs are fertilized can be tricky. You’re not alone in wondering how to tell if an egg is fertile without cracking it open. Luckily, there are simple methods to help you identify the fertilized eggs easily.
To tell if a chicken egg is fertile in 10 simple steps, start by examining the shell for smoothness and uniformity—fertile eggs tend to be smoother and tougher.
Candle the egg to look for dark spots or blood vessels, especially around day 7-10, which indicate development.
Check for a white ring around the yolk, signaling fertilization, and monitor visible blood vessels as the embryo grows.
Proper handling, fresh eggs, and maintaining good incubation conditions are key.
If you want to learn more, keep exploring these helpful tips.
Key Takeaways
- Candle the egg to check for blood vessels and dark spots, which indicate embryo development.
- Look for a white ring called the blastodisc on the yolk; its presence suggests the egg is fertilized.
- Examine the shell surface for smoothness and uniformity. Fertile eggs tend to have a tougher, smoother shell.
- During candling between days 8-10, look for internal development signs like veins or embryo discs.
- Store eggs properly and handle them gently to avoid damaging the shell, which ensures a more accurate fertility assessment.
How to Visually Identify a Fertile Egg
Have you ever wondered how to tell if a chicken egg is fertile just by looking at it? One way is to observe the eggshell texture. Fertile eggs often have a smoother, more uniform surface.
Fertile eggs tend to have a smoother, more uniform shell surface.
Infertile eggs can appear rougher or more irregular. Pay attention to tiny differences in shell consistency—these subtle variations can be clues.
Look for beak markings, which are small, chalky deposits that sometimes form near the air cell. These markings may indicate a fertilized egg if they appear as chalky streaks or spots.
The eggshell’s overall appearance, including texture and unusual markings, can give you hints about fertility. Keep in mind, these visual signs aren’t foolproof, but they can help you make an educated guess.
Combining these observations with other methods provides a more reliable way to identify fertile eggs at a glance.
Examining the Eggshell for Fertility Signs
Examining the eggshell carefully can reveal subtle signs of fertility. Look closely for differences in texture and color variations.
Fertile eggs often have smoother shells, while infertile ones might show more roughness or irregularities. Pay attention to color: fertile eggs can sometimes display slight differences, like a matte finish versus a glossy shell.
| Eggshell Texture | Color Variations |
|---|---|
| Smooth and firm | Slightly matte or glossy |
| Slight roughness | Irregular patches in color |
| Thin or fragile | Consistent or uneven hue |
| Tough exterior | Bright or dull tones |
| Cracks or lines | Differences in shade |
These details can help you spot signs of fertility, but remember they aren’t definitive on their own. Always combine these observations with other methods for the most accurate results.
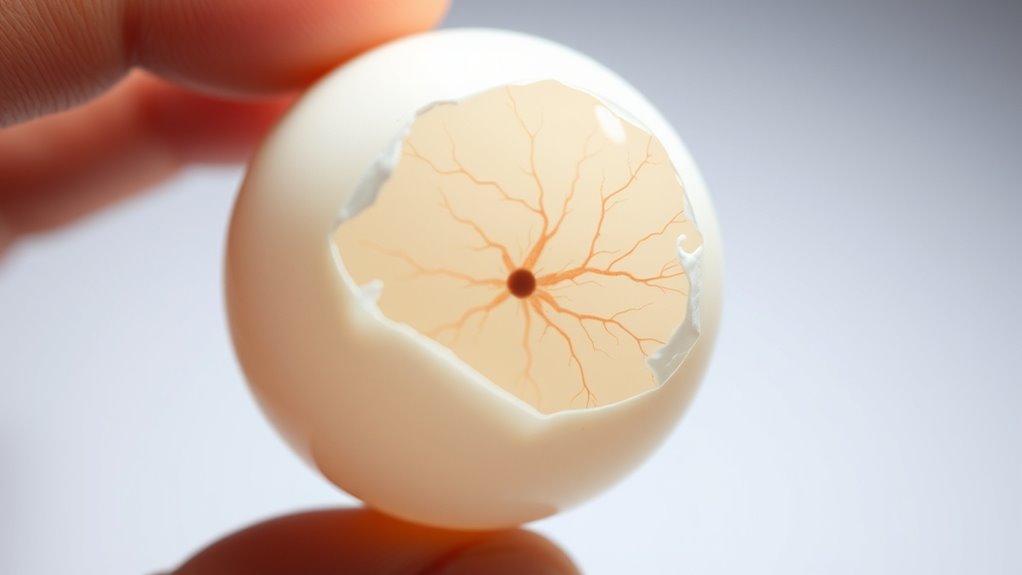
How to Candle Eggs to Check for Fertility
CandleEgging is a simple way to check if eggs are fertile by looking inside the shell. Just hold the egg up to a light so you can see through it and spot any signs of development.
Look for a dark spot or tiny blood vessels—that’s a sign the egg is fertile. If the egg looks clear with no structure, it’s probably infertile.
CandleEgging also helps you understand hen nutrition, since healthy hens lay eggs with better internal development. By checking eggs regularly, you can make smarter choices that affect flavor and quality.
A fertile egg usually shows veins or blood vessels inside. You might see an embryo at later stages. The shell should be intact with no cracks or abnormalities.
This easy process helps you connect more with your flock and makes sure you’re getting the most out of their reproductive potential.
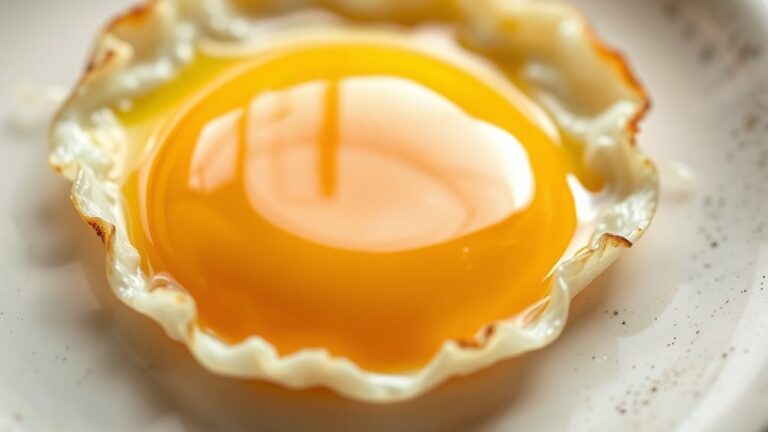
Recognizing the White Ring in Fertilized Eggs
When you look inside a fertilized egg, you’ll see a white ring called a blastodisc around the yolk. It’s kind of like a little marker that shows the egg is actually fertilized.
This white ring is helpful because it helps tell fertilized eggs apart from infertile ones, which don’t have that feature. So, by comparing eggs with and without the white ring, you can more easily figure out which eggs are likely fertilized.
Significance of White Ring
A white ring visible on the eggshell is a key sign that the egg is fertilized, especially in the early stages of incubation. Recognizing this ring helps you understand the egg’s fertilization status and care needs. When handling and storing eggs, pay attention to this detail for better hatchability.
The white ring shows that your egg has the potential to develop into a chick. It’s a reminder to handle eggs gently and avoid cracks that could harm fertility. Keeping eggs at the right temperature during storage helps preserve this sign of fertility.
This ring connects you to the natural process of life and reminds you of the importance of gentle handling. It also inspires hope for healthy chicks. Proper storage makes sure fertilized eggs stay viable and ready to hatch.
Visual Indicators of Fertility
Spotting the white ring on an eggshell is one of the easiest ways to tell if an egg is fertilized. This ring shows up as a thin, white circle at the base of the yolk and signals fertility.
The eggshell’s texture also gives us clues. A smoother shell usually means the egg is fertilized, while more porous shells can suggest infertility. Eggs from hens with a dominant rooster tend to have a clearer white ring.
Comparing Fertilized vs. Infertile
When examining an egg, the white ring around the yolk is a key indicator that it’s fertilized. This ring, known as a blastodisc, signals potential life and helps you distinguish fertilized eggs from infertile ones.
Recognizing this detail during egg collection is essential for poultry enthusiasts and farmers who want to nurture future chicks. To keep fertilized eggs fresh, use proper storage techniques, keeping them at consistent temperatures and handling them gently.
Feel proud knowing you’re nurturinglife’s beginning. Begin a journey from egg collection to hatchling. Protect the future by choosing the right storage techniques. Witness the miracle of life with every fertilized egg you handle.
Developmental Stages in a Fertile Egg
Once a hen fertilizes an egg, the development process kicks off with the formation of the germinal disc, which is where the embryo will start to grow. As days go by, you’ll see the albumen, or egg white, and chalazae starting to form. These structures are really important because they help protect and nourish the tiny embryo as it develops. Getting to know the timeline of how the embryo develops inside a fertilized egg can help you understand the key stages it goes through.
Formation of Germinal Disc
Have you ever wondered how a fertilized chicken egg begins its journey toward development? It all starts with the formation of the germinal disc, a tiny white spot on the yolk’s surface. This is where the magic begins when a hen’s behavior signals readiness, and you make sure to collect eggs properly.
As the hen lays the egg, the germinal disc forms from a single cell that contains the genetic material from the rooster. Feeling excited every time you collect eggs, knowing they might be fertilized.
Watching a hen’s alert behavior can indicate ovulation and the start of this process. Noticing how quickly the germinal disc develops under the right conditions is fascinating.
Understanding that every egg has the potential inside for life makes this even more special. This tiny disc is the starting point for embryonic growth and future hatchlings.
Albumen and Chalazae Formation
Following the formation of the germinal disc, the egg begins to develop its protective and nourishing layers. The albumen, or egg white, forms around the yolk, providing essential nutrients and cushioning.
Chalazae, the twisted fibers, anchor the yolk in the center, ensuring proper positioning. As this happens, the albumen’s pH increases slightly, which influences egg freshness and helps detect fertility.
Eggshell porosity also plays a role by allowing gas exchange vital for embryo development. These features indicate a healthy, fertile egg progressing through early developmental stages.
Embryo Development Timeline
Once a fertilized egg begins developing, its progress can be traced through a series of distinct stages that unfold over incubation. In the early days, the embryo forms as the blood vessels in the egg yolk grow, signaling life’s early spark.
As days pass, the embryo’s tiny features become visible, and the shell thickness gradually adapts to support growth. The egg yolk sustains the embryo, providing essential nutrients.
Around days 8-10, you might see the developing chick’s heartbeat and limb buds. By day 18-21, the chick is nearly fully formed and ready to hatch.
Witness incredible transformation from a tiny dot to a hatchling. Feel a surge of awe seeing the embryo’s heartbeat. Observe the delicate balance of shell thickness protecting new life. Experience anticipation as the hatch day nears.
What Fertile Eggs Look Like at Different Incubation Days
As a fertile egg progresses through incubation, its appearance changes noticeably at different stages. Early on, the eggshell’s color stays uniform, usually matching the hen’s typical egg color, which reflects her fertility.
During the first days, cracks and blemishes are minimal, and the shell remains smooth. Around days 7 to 10, you might see a small, faint darker spot called the “embryo disc” forming inside, but it’s still hidden beneath the shell.
The shell’s color stays consistent, though slight differences may show as the embryo develops. By day 14, a network of blood vessels may be visible through the shell if you candle the egg. This indicates healthy growth, though the shell’s color largely stays the same.
As incubation reaches day 21, the embryo fills much of the egg cavity. Still, the shell’s coloration usually stays the same, offering subtle clues about the development progress.
Tips to Avoid False Positives When Checking Fertility
Checking egg fertility can be tricky, and it’s easy to mistake normal early development signs for false positives. To avoid this, focus on proper egg handling and storage.
Proper handling and storage prevent false positives in egg fertility checks.
First, always use clean, fresh eggs and practice correct storage methods to prevent confusion. Using eggs within a week of collection helps guarantee accuracy. Keep eggs in a cool, consistent environment—preferably in the carton with the pointed end down.
Avoid excessive handling that could damage the shell or hide true signs of fertility. Remember, nutritious eggs offer better nutrients for developing embryos, so prioritizing dietary quality can support fertility.
Tips to Avoid False Positives:
- Use freshly collected eggs stored properly.
- Handle eggs gently to prevent shell damage.
- Keep eggs at consistent, cool temperatures.
- Focus on nutritional benefits to support fertility and embryo health.
Troubleshooting Common Mistakes in Fertility Testing
Even when you follow proper egg handling and storage techniques, mistakes can still happen during fertility testing that lead to false results. One common error is misinterpreting the appearance of the yolk or white, which can be affected by poor egg nutrition or hen health. Make sure eggs are fresh and stored correctly to prevent development issues.
Here’s a helpful reminder:
| Issue | Fix |
|---|---|
| Overlooking egg freshness | Use recent eggs for accurate testing |
| Ignoring hen health status | Regularly monitor and support hen health |
| Ignoring egg nutrition | Provide a balanced diet to improve fertility |
Incorrect interpretation of the egg’s appearance can happen if you miss key factors like nutrition and overall hen health. Regularly check your hen’s health and handle eggs properly to avoid false negatives or positives in fertility testing.
Final Tips for Improving Hatch Success
Looking to improve your hatch success? It all starts with paying attention to the basics. Make sure your incubation environment is just right and keep things clean. Regularly check that the temperature and humidity levels are spot on—that way, your eggs get the perfect conditions to develop.
And don’t forget about hygiene! Keeping your incubator clean and sterilized helps prevent any bacteria or mold from sneaking in and causing problems. These simple steps might seem small, but they can really boost your hatch rates and give your eggs the best shot at success.
Optimize Incubation Conditions
Ensuring ideal incubation conditions is key to boosting your hatch success rate. Proper temperature, humidity, and airflow help create a stable environment that supports healthy embryo development.
Pay close attention to feeding habits. Nourishing your hens well before laying helps produce fertile eggs. A good diet supports overall health and increases fertility chances.
Adequate coop ventilation is essential. Fresh air reduces mold and bacteria, which can cause developmental issues. Good airflow also helps prevent excess moisture buildup.
To get the best results, follow these tips:
- Keep the temperature steady at around 99.5°F (37.5°C).
- Maintain humidity levels between 50–55% for proper embryo hydration.
- Ensure good airflow to prevent excess moisture.
- Provide high-quality feed to keep your hens healthy and fertile.
Maintain Cleanliness and Hygiene
Have you thought about how cleanliness affects hatch success? Keeping eggs clean and stored properly helps prevent bacteria and mold from damaging developing embryos. Always store eggs in a cool, clean place and handle them with clean hands or gloves.
Make sure to disinfect incubators, trays, and the surrounding areas regularly. It reduces the risk of contamination and creates a healthier environment for your eggs. Keeping everything sanitized promotes better hatch rates.
Avoid overcrowding in your incubator, as this can trap moisture and dirt, increasing contamination chances. Stick to a routine cleaning schedule and make sure eggs are clean and debris-free before incubation. Good hygiene practices help create the best conditions for successful hatching.
Frequently Asked Questions About Fertile Eggs
Many people wonder whether a particular egg is fertile, especially if they plan to hatch chicks or just want to learn more about their eggs. Understanding fertility can also help you decide how often to collect eggs and make sure you’re getting the most nutritional benefits for your family. Fertile eggs often look like regular eggs, but they might develop subtle differences over time.
Here are some common questions:
- Does an egg’s appearance guarantee it’s fertile? No, visual clues aren’t reliable.
- How often should I collect eggs to improve fertility chances? Daily collection keeps eggs fresh and reduces cracks.
- Can fertilized eggs offer better nutritional benefits? Not necessarily, but they’re essential if hatching is your goal.
- How do I identify if an egg is fertile without cracking it? Candling helps reveal signs of a developing embryo.
Knowing these facts helps you better manage your flock and improve egg quality, ensuring you get fresh, nutritious eggs and hatchlings when you want them.
Frequently Asked Questions
How Long Can a Fertilized Egg Remain Viable Outside an Incubator?
A fertilized egg can stay viable outside an incubator for about 7 to 10 days if stored properly.
Keep the eggs in a cool, humid place, ideally around 50-60°F, and make sure to turn them regularly.
External factors like temperature swings, humidity changes, and handling can reduce their viability.
So, maintaining consistent conditions is really important.
After 10 days, the chances of successful incubation drop significantly.
Does Eggshell Color Indicate Fertility?
Don’t judge a book by its cover, especially when it comes to eggshell color. Eggshell pigmentation doesn’t tell you anything about fertility; it’s mainly about the breed and genetics.
Fertility markers aren’t visible on the shell’s surface. Instead, they’re found inside the egg during development. So, don’t rely on eggshell color to see if an egg is fertile.
Instead, focus on other signs like candling or trying to hatch. These methods give you a better idea of whether the egg is fertile or not.
Can a Hen Distinguish Fertilized From Unfertilized Eggs?
A hen can’t really tell whether an egg is fertilized or not just by looking at or being around it. Her behavior around eggs usually stays the same no matter if they’re fertilized or not.
She’ll lay eggs daily without caring about their fertilization status, so you won’t see any clear signs that she’s detecting anything unusual. To find out if an egg is fertilized, you’ll need to check it visually or use other methods.
Her behavior alone isn’t a reliable way to determine if an egg is fertilized or not. You’ll have to look at the egg itself to know for sure.
Are Plastic or Fake Eggs Useful for Fertility Testing?
Fake eggs are surprisingly helpful for fertility testing, acting like a crystal ball for your flock’s reproductive health. Using artificial eggs in nesting boxes teaches hens where to lay, encouraging consistent laying habits and making it easier to identify fertilized eggs.
They can also help you observe hen behavior, but they don’t truly determine fertility. For accurate results, check eggs for signs of development or use other testing methods.
How Does Hen Health Affect Egg Fertility?
Hen health directly impacts egg fertility, as a healthy hen is more likely to produce fertile eggs. Your hen’s diet plays a crucial role—feeding her a balanced mix of nutrients helps support her reproductive health.
Regular egg candling allows you to monitor fertility, but if she’s unwell or not well-nourished, fertility can decline. Ensuring her overall well-being boosts the chances of producing viable, fertile eggs.
Conclusion
Now that you know how to spot a fertile egg, imagine gently holding one in your hand. Feel its smooth, warm shell and peer inside with a candle’s glow.
With practice, you’ll see tiny veins and a developing embryo, like a secret garden thriving within. Your attentive eyes and care will nurture these eggs toward new life.
This process transforms simple shells into proud moments of hatchery success. Keep observing, learning, and enjoy the rewarding journey of incubation and identifying a fertile egg.